How to Repair a Brake Line: Tools and Steps
How to repair a brake line at home: cut out the failed section, flare the cut ends, join it with unions and bleed the brakes before driving.

On this page
How to repair a brake line starts with finding the failed section and deciding whether to splice in a new piece or replace the whole run. The short answer: cut out the damaged section, flare the cut ends and both ends of the new line, join it with unions, then bleed the brakes until the pedal feels firm. A brake line repair is a cut, flare and join job, so it needs a cutter, a flaring tool, fittings and fresh fluid matched to your vehicle.
As an Amazon Associate I earn from qualifying purchases. GarageToolHQ earns a commission when you buy through links on our product pages, at no extra cost to you. Read our affiliate disclosure.
Below: the steps, the safety notes, and the gear for each part of the job.
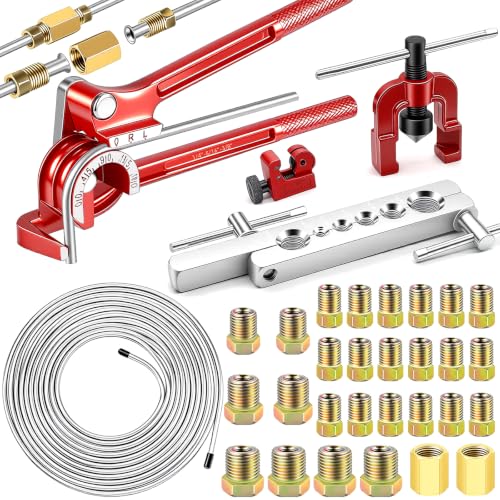
smseace 26Pack 3/16 Inch Brake line kit Brake Line
A 26-pack 3/16 in brake line kit: 25 ft of zinc-plated line, 20 fittings with unions, a bender, a single flare tool and a cutter.
Pros
- 25 ft of zinc-plated 3/16 in line
- 20 fittings with unions
- 3-in-1 bender, bends to 180 degrees
- Cutter, 1/8 in to 7/8 in
Cons
- Single flare only, no double or bubble
- Title says 26-pack; contents list 20 fittings plus tools
- Line is 3/16 in only
- No storage case stated

DPTOOL Brake Line Flaring Tool Kit Professional 45
A 37 and 45 degree flaring tool kit for single, double and bubble flares on 3/16 in to 3/8 in and 4.75 mm and 6 mm tubing.
Pros
- 37 and 45 degree single, double, bubble flares
- Dies for 3/16 to 3/8 in, 4.75 mm, 6 mm
- Steel, heat-treated, oxidized body
- Plastic suitcase and manual included
Cons
- Must be used with a vice
- No line or fittings included
- No weight stated
- Title lists 4.75 mm; bullets add 6 mm

OMT Brake Line Flaring Tool Kit
A 37 and 45 degree flaring tool kit with dual rotating die heads for single, bubble and double flares on 3/16, 1/4, 5/16 and 3/8 in tubes.
Pros
- Dual rotating die heads, 37 and 45 degree
- Single, bubble and double flares
- Premium steel, T-handle vise mount
- Labeled die head for size alignment
Cons
- Not suitable for stainless steel pipes
- No line or fittings included
- Vise mount, bench use only
- No case stated

25Ft 1/4" and 3/16" Brake Line Kit,Single & Double
A brake line kit with 25 ft of 3/16 in and 25 ft of 1/4 in copper-plated line, 32 inverted fittings and a single and double flaring tool kit.
Pros
- Two lines: 25 ft 3/16 in, 25 ft 1/4 in
- 32 inverted tube nuts
- Single and double flaring, 5 adapters
- Blow molded case
Cons
- No warranty term stated
- No bubble flare
- Adapters stop at 1/2 in
- No bender stated
How to repair a brake line: the steps in order
- Find the failed section first. Follow the line along its run, note the line size and flare type at each fitting, and check how far the rust reaches. If the line is rusted along its length, replace the whole run rather than splicing.
- Work safely: brakes stop the vehicle. Park on level ground, chock the wheels, and never work under a vehicle held up by a jack alone. If the pedal goes to the floor, do not drive.
- Cut out the damaged section. Cut with the tube cutter, then deburr the inside and outside so no shavings stay in the line.
- Bend the new line to match the old run. Use the bender to shape the line, keeping bends smooth so the line stays round through the turn.
- Flare both ends. Pick the flare the fittings need: the flare type and angle must match the fittings on your vehicle, so check the existing fitting before choosing. Fit the fittings on before flaring, with the flared ends facing outward.
- Join with unions and route the line. Connect the new section with unions, route it along the old path, and keep it clear of moving parts.
- Bleed the brakes and check for leaks. Bleed as the manual describes, check the pedal feel, and look at every union for leaks before driving.
Safety notes before you start a brake line repair
Brakes are safety-critical: a leak or a bad flare can leave the vehicle without brakes. Never drive with a leaking brake line or a soft pedal. Brake fluid can strip paint, so keep it off the bodywork and wear eye protection and gloves. If any step is beyond your tools or your manual, book the job out.
If the pedal feels soft or sinks after bleeding, do not drive. Re-check every union and flare for fluid.
Use rated jack stands on solid ground, wear eye protection with power and air tools, keep fuel-burning equipment out of a closed garage, and follow the manual for every tool. Read our Safety Disclaimer.
The gear that handles each step of a brake line repair
The line kits carry the line and fittings, the flaring tools shape the ends, and the cutter and bender prepare the new section.
FAQ: garage tools
Can I repair a brake line with a union and a short section?
Yes. Cut out the failed section, flare the cut ends and both ends of the new line, and join it with unions, matching the line size and flare type. If the line is rusted along its length, replace the whole run.
What flare does a brake line need?
It depends on the fittings on your vehicle: the flare type and angle must match them, so check the existing fitting before choosing. The DPTOOL and OMT kits make single, double and bubble flares at 37 and 45 degrees.
Do I need a flaring tool, or does the kit include one?
The smseace and VKQTS kits include a flaring tool with the line and fittings, while the DPTOOL and OMT kits are flaring tools only.
Can I bend a brake line by hand?
A bender keeps the line round through the bend. The smseace kit includes a 3-in-1 bender for bends to 180 degrees on copper, aluminum and stainless steel pipe.
How do I know the repair holds?
Bleed the brakes as the manual describes, check the pedal feel, and look for fluid at every union. If the pedal feels soft, do not drive.
Related: how to check brake fluid and the engine and shop equipment hub.